Skip to content
 In the world of product development, speed, precision, and repeatability are essential. CNC prototype machining enables engineers and product teams to transform digital designs into high-precision physical parts with tight tolerances and fast turnaround times. Whether you’re prototyping aerospace components or consumer electronics, this process bridges the gap between concept and production readiness.
This guide provides a complete breakdown of CNC prototype machining—from how it works to materials, applications, benefits, and design tips.
Let’s explore how CNC machining helps bring your product ideas to life with unmatched speed and precision.
What Is CNC Prototype Machining?
Prototyping must be fast, accurate, and production-representative—CNC prototype machining delivers all three.
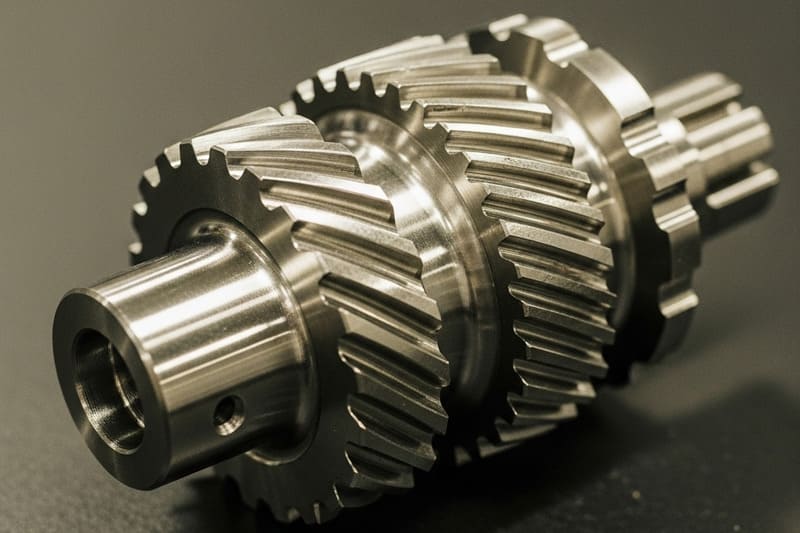
CNC (Computer Numerical Control) prototype machining is the process of using automated machine tools to fabricate custom parts directly from CAD models. It removes material from a solid block (a billet or blank) to form the final geometry, making it a subtractive manufacturing process. CNC machining is highly valued in product development for its ability to produce physical prototypes that mirror end-use functionality.
Why CNC Machining for Prototypes?
Unlike 3D printing, which builds parts layer by layer, CNC machining starts with a solid material and precisely removes excess. This method delivers high dimensional accuracy, smooth surface finishes, and real material performance—critical for testing form, fit, and function.
I often recommend CNC prototype machining when the goal is to evaluate a design in real-world conditions. Whether it’s assessing mechanical stress, verifying enclosure fit, or checking component alignment, CNC-machined prototypes provide data you can trust before scaling to production.
Core Characteristics
- Subtractive Process: Material is milled, turned, or cut away
- Based on CAD/CAM: G-code from 3D models drives machine tools
- Multi-Axis Capability: Machines range from 3 to 5+ axes for complex shapes
- Real Material Options: Supports metals and engineering-grade plastics
When Should You Use It?
Use CNC prototype machining when your design must undergo functional testing, withstand real mechanical loads, or be presented to stakeholders as a “final-look” piece. It’s also a great option for bridge production—low-volume runs that help transition from prototype to full-scale manufacturing.
| Prototype Need | Is CNC Machining a Good Fit? |
|---|---|
| High mechanical precision | ✔ Yes |
| Rapid delivery (1–5 days) | ✔ Yes |
| Material-specific testing | ✔ Yes |
| Highly organic shapes (e.g., lattices) | ✖ Consider 3D printing |
| Low-cost rough visualization | ✖ Consider PLA 3D prints |
From my own client projects, I’ve seen CNC prototypes reduce time-to-market dramatically. Instead of weeks spent waiting for cast or molded samples, clients get functional, testable parts in days—often with better precision than the final production run.
How CNC Prototype Machining Works?
Turning a digital model into a real-world part sounds complex, but CNC prototype machining simplifies it into a streamlined, repeatable process.
CNC prototype machining follows a five-step workflow that transforms CAD designs into precision-cut parts using automated equipment. Each stage—from CAD modeling to final inspection—is critical for ensuring the part meets functional, dimensional, and cosmetic expectations.
Dive Deeper
1. CAD Modeling
Everything begins with a 3D model. I typically use software like SolidWorks or Fusion 360 to define part geometry, dimensions, tolerances, and any special features (threads, chamfers, radii). The more detailed the model, the smoother the downstream process.
2. CAM Programming
Next, the CAD file is imported into CAM (Computer-Aided Manufacturing) software, such as Mastercam or Fusion’s CAM module. Here, I generate toolpaths—precise movements the CNC machine will follow—and post-process these into G-code that drives the machine. During this step, I choose tools, feeds, speeds, and machining strategies optimized for efficiency and surface quality.
3. Material Selection
Material choice affects everything from machining time to part performance. For prototypes, I often recommend:
- Aluminum 6061: Great balance of machinability and strength
- POM (Delrin): Low friction and excellent dimensional stability
- ABS: Cost-effective for cosmetic or early-stage models
4. CNC Machining
The prepared stock is clamped onto the machine bed. Then, CNC mills, lathes, or 5-axis centers precisely cut the material. Operations may include:
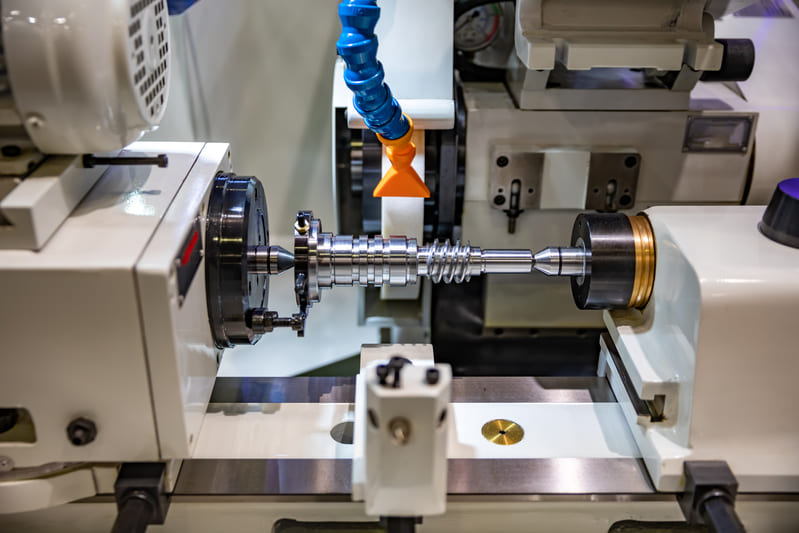
- Milling – for flat surfaces, slots, and pockets
- Turning – for cylindrical profiles
- Drilling – for holes, threads, or tapped features
- Profiling – for contouring and chamfering
5. Post-Processing & Inspection
Once machined, the part often needs post-finishing. Depending on requirements, this might include:
- Bead blasting to remove tool marks
- Anodizing or powder coating for protection or color
- Engraving for part numbers or logos
For inspection, I use calipers, micrometers, or even CMMs to verify that tolerances are met. If needed, I’ll adjust toolpaths and rerun the program to fine-tune accuracy.
Summary Workflow Table
| Stage | Tools Used | Purpose |
|---|---|---|
| CAD Modeling | SolidWorks, Fusion 360 | Create geometry and define tolerances |
| CAM Programming | Mastercam, Fusion CAM | Generate G-code for toolpaths |
| Material Selection | Aluminum, ABS, POM | Choose for strength, cost, and purpose |
| CNC Machining | Mills, lathes, routers | Subtractive material removal |
| Post-Processing | Blasting, anodizing, polishing | Improve appearance and function |
| Inspection | CMMs, calipers, micrometers | Verify dimensions and tolerances |
This five-step process has been my go-to system for years. It balances speed with flexibility, enabling design teams to test, revise, and finalize products with minimal delay.
Common Materials Used in CNC Prototypes?
Not all materials are created equal—especially when prototyping for performance, aesthetics, or manufacturability.
The right material choice in CNC prototype machining can dramatically influence machining speed, surface finish, structural integrity, and overall cost. I always advise selecting a material that closely mimics your production-grade equivalent, ensuring the prototype accurately reflects real-world performance.
Dive Deeper
1. Aluminum 6061
Why I Use It: It’s the gold standard for prototypes requiring strength without excessive weight. It machines quickly, takes finishes well (like anodizing), and is affordable.
Typical Use Cases: Aerospace brackets, heat sinks, enclosures, and electronic housings.
2. Stainless Steel 304
Why I Use It: When corrosion resistance and strength are non-negotiable, 304 stainless delivers. It’s tougher to machine than aluminum, but the end results are long-lasting and functional.
Typical Use Cases: Medical device prototypes, food equipment, and outdoor mechanical assemblies.
3. Brass
Why I Use It: Brass is soft and extremely machinable, which makes it perfect for intricate components. Plus, it has great thermal and electrical conductivity with a premium look.

Typical Use Cases: Connectors, valves, decorative panels, and instrument fittings.
4. POM (Delrin)
Why I Use It: This plastic offers dimensional stability, low friction, and great wear resistance. I turn to it for functional parts that mimic injection-molded components.
Typical Use Cases: Bushings, gears, bearings, and sliding mechanisms.
5. ABS Plastic
Why I Use It: It’s affordable, impact-resistant, and easy to machine. For early prototypes or low-load applications, ABS is hard to beat.
Typical Use Cases: Consumer product casings, prototypes for molded plastic parts, internal mechanical covers.
Material Comparison Table
| Material | Key Traits | Common Applications |
|---|---|---|
| Aluminum 6061 | Lightweight, strong, easy to machine | Aerospace, electronics, fixtures |
| Stainless Steel 304 | Corrosion-resistant, strong, biocompatible | Medical, industrial, food-grade parts |
| Brass | Soft, conductive, corrosion-resistant | Valves, fittings, electronics |
| POM (Delrin) | Low friction, high stiffness, machinable | Gears, jigs, enclosures |
| ABS | Inexpensive, impact-resistant, stable | Prototypes, consumer goods, covers |
I always remind clients: material selection isn’t just about looks or cost—it’s about simulating function, machining performance, and final part quality. For CNC prototypes that inform design decisions and downstream processes, picking the right material makes all the difference.
Benefits of CNC Machining for Prototyping?
Getting from idea to iteration fast is often the difference between innovation and obsolescence.
CNC prototype machining is one of my go-to methods for bridging that gap—especially when the stakes are high. With unmatched accuracy, speed, and material versatility, CNC machining empowers engineers to validate their designs in real-world conditions, even before production tooling is finalized.
Dive Deeper
1. Fast Turnaround
How it helps: Because CNC machining doesn’t rely on molds or setup-intensive tooling, we can move from CAD file to part in as little as 1–5 business days. For time-sensitive development cycles, that speed means faster design validation and quicker product launches.
2. High Precision
How it helps: CNC machines consistently hit tolerances of ±0.01 mm or better. That’s critical for verifying fit, function, and performance—especially in high-stakes fields like aerospace or medical devices. You can test the part like it’s the final version.

3. Repeatability
How it helps: CNC ensures every prototype is made exactly like the last, with no deviation. I’ve seen this benefit shine when iterating designs based on test feedback—one minor geometry tweak, and I know the rest of the part remains identical.
4. Broad Material Compatibility
How it helps: Whether you need aluminum, stainless steel, Delrin, or ABS, CNC machining handles it. That means you can prototype with materials that reflect actual production conditions—mechanically, thermally, and visually.
5. Full Functional Testing
How it helps: Unlike 3D-printed parts that might be brittle or dimensionally unstable, machined parts are tough. You can test them for stress, wear, and assembly under load without compromising the prototype’s integrity.
6. Design Validation & Flexibility
How it helps: I often use CNC machining as a feedback loop. A first-round prototype informs tolerances, assembly issues, or functional mismatches. Then we iterate rapidly until everything aligns—well before production kicks off.
Comparison Table
| Benefit | Why It Matters |
|---|---|
| Fast Turnaround | 1–5 day lead times keep development moving |
| High Precision | Tight tolerances allow functional and dimensional verification |
| Repeatability | Each iteration is consistent for controlled testing |
| Material Flexibility | Machine both metals and plastics used in final production |
| Functional Testing | Parts perform under stress or load conditions |
| Design Feedback | Test early, improve fast, reduce downstream costs |
From my experience, CNC machining is invaluable for serious product development. It doesn’t just give you a prototype—it gives you insight, confidence, and the foundation for a better final product.
Industries Using CNC Prototyping?
Prototype success depends heavily on application-specific requirements—and that’s where CNC machining proves its versatility.
Over the years, I’ve seen CNC prototyping play a key role across industries that demand speed, precision, and functional validation. From aerospace to medical tech, CNC enables manufacturers to iterate quickly without compromising on quality.
Dive Deeper
Aerospace
Common Parts: Brackets, mounting frames, turbine housings
Why CNC Matters: Aerospace components often require tolerances within microns and must pass rigorous stress testing. CNC prototyping enables teams to test actual material performance before scaling production.
Automotive
Common Parts: Engine mounts, dashboard brackets, heat exchangers
Why CNC Matters: Prototypes are used for crash testing, aerodynamic evaluation, and mechanical stress validation. CNC delivers dimensionally stable parts in aluminum or engineering plastics that closely simulate production runs.
Medical Devices
Common Parts: Surgical instruments, implant fixtures, orthopedic jigs
Why CNC Matters: In the medical world, prototyping with biocompatible materials like stainless steel or PEEK is critical. CNC machining meets hygiene, tolerance, and design verification needs with speed and reliability.
Robotics & Automation
Common Parts: End effectors, sensor brackets, motor housings

Why CNC Matters: In robotic systems, even a 0.1 mm misalignment can lead to performance degradation. CNC allows rapid iteration of parts that require perfect fit and structural integrity.
Consumer Electronics
Common Parts: Phone frames, heatsinks, connector housings, buttons
Why CNC Matters: Brands use CNC prototypes to validate ergonomics, internal layouts, and thermal performance. It’s essential for short runs of pre-launch units used in user testing or investor presentations.
Comparison Table: Where CNC Prototyping Delivers Most
| Industry | Key Parts | Prototyping Objective |
|---|---|---|
| Aerospace | Brackets, turbine enclosures | Verify mechanical strength and dimensional fit |
| Automotive | Engine mounts, interior panels | Performance testing and thermal validation |
| Medical | Instruments, implant fixtures | Design validation and sterilization readiness |
| Robotics | Actuator mounts, control brackets | Precision alignment and iterative improvements |
| Consumer Electronics | Enclosures, buttons, heatsinks | Cosmetic approval and internal clearance check |
Regardless of the sector, CNC prototyping provides one consistent benefit: it transforms ideas into tangible, test-ready parts that improve decision-making and reduce risk before full-scale production begins.
Key Design Considerations?
Poor design can lead to unnecessary costs or delays, even with the best CNC equipment.
After reviewing hundreds of prototype projects, I’ve noticed that optimizing designs for CNC machining saves time, money, and frustration. Below are the core considerations I always apply—or recommend to clients—before hitting the “Go” button on a prototype run.
Dive Deeper
Tolerances
Rule of Thumb: Only specify tight tolerances (±0.01 mm or better) when absolutely necessary. Standard tolerances of ±0.1 mm are often sufficient for fit and function testing.
Overly tight tolerances can increase cost by 20–50% due to slower machining speeds and extra inspection requirements. Use ISO tolerance standards for holes, shafts, and mating parts to maintain clarity.
Geometry Constraints
Design Tip: Avoid sharp internal corners and undercuts unless necessary. CNC tools are round—internal features should have radii to match standard cutter sizes.
Deep pockets (more than 4x their diameter) often cause tool chatter or require special tooling, which adds to the cost. Break large parts into smaller sections if needed to maintain accuracy.
Threaded Features & Holes
- Label thread specs clearly (e.g., M6x1.0-6H or ¼-20 UNC).
- Avoid threading very small holes (< M2), which can be fragile and costly.
- Use standard drill depths and add relief at the bottom of blind holes to avoid tap breakage.
Material Selection
Choose prototype materials that resemble the mechanical properties of your production-grade equivalents. For example:

- Aluminum 6061 for general structural parts
- Delrin (POM) to simulate molded plastic
- Brass or stainless steel for high-strength functional tests
Surface Finish Requirements
If your prototype needs a cosmetic finish (like polishing or anodizing), design around those constraints. Include a note about surface finish expectations in your drawing—e.g., Ra ≤ 1.6 µm for critical faces.
Fastening & Assembly Features
- Use alignment pins or bosses to aid assembly.
- Design fillets at mating edges to reduce stress.
- Don’t forget to define tolerances for press-fit or slip-fit features.
Quick-Reference Table: Design Do’s and Don’ts
| Design Element | Best Practice | Common Mistake |
|---|---|---|
| Tolerances | Use tight tolerances only on critical features | Over-tolerancing the entire part |
| Internal Corners | Add fillets to match cutter radius | Sharp internal angles |
| Hole Depth | Max 3–4x diameter for standard drills | Very deep or narrow holes without relief |
| Threads | Use standard thread sizes and depths | Custom thread pitches or tiny threaded holes |
| Surface Finish | Specify only on faces where it’s needed | Unnecessary finish spec on all faces |
Keeping these design principles in mind allows me—and my clients—to receive better prototypes, faster, and with fewer modifications. The more design-aligned with CNC capabilities, the smoother the project will go.
Prototype vs. Production Machining?
Mixing up prototype and production strategies can lead to delays and unnecessary costs.
When I help clients transition from prototyping to full-scale manufacturing, one of the first conversations we have is about adjusting expectations. CNC prototype machining is fast and flexible, but not always optimized for scale. Production machining, on the other hand, focuses on cost-efficiency and repeatability over hundreds or thousands of parts.
Dive Deeper
Understanding the Core Differences
Both prototype and production machining use similar tools and machines, but they differ in setup, workflow, and intent. Prototypes validate a design’s form, fit, and function. Production runs execute that design at scale, often with dedicated tooling and long-term quality control strategies.
Process Comparison Table
| Aspect | Prototype Machining | Production Machining |
|---|---|---|
| Volume | 1–10 parts | 100s to 100,000+ parts |
| Setup Cost | Low to moderate | High (custom jigs, tooling) |
| Lead Time | 1–5 days | 2–6+ weeks (including tooling prep) |
| Focus | Design testing, DFM, approvals | Speed, repeatability, cost reduction |
| Tolerances | Tight only where needed | Controlled across entire batch |
| Machine Flexibility | High (multi-tool setups) | Standardized workflows with minimal variation |
Use Case Scenarios
- Prototype: A single bracket for thermal stress testing in aerospace.
- Production: 10,000 brackets for assembly into finished UAVs.
Budgeting Insights
Prototype machining might seem pricier per unit, but it avoids the massive upfront tooling and fixture costs of production. Once the design is locked, transitioning to production methods (including multi-cavity fixtures or automated loading) makes per-part pricing significantly lower.

My Rule of Thumb
“If you’re making less than 20 parts, treat it like a prototype. If you’re making 100 or more, plan for production from day one.”
And when you’re not sure? Start with a prototype—but design it to be scalable. This means avoiding exotic setups or tolerances that are difficult to replicate at scale.
Understanding this divide—and preparing for it early—can save weeks in development and thousands in budget.
Tolerance Guidelines for Prototypes?
Tighter tolerances sound great—until they inflate cost and lead times.
In prototype machining, I’ve seen teams default to “as tight as possible” tolerances out of habit. But here’s the truth: over-tolerancing is one of the fastest ways to drive up manufacturing costs and introduce unnecessary complexity. Tolerance should serve functionality, not fear.
Dive Deeper
What Is Tolerance, Really?
Tolerance refers to the permissible variation in a part’s dimension. In CNC machining, it’s the margin of error that still allows a part to function properly. These tolerances can range from ±0.1 mm for general prototypes to ±0.005 mm for highly critical features.

Common Tolerance Guidelines Table
| Feature | Standard Tolerance |
|---|---|
| General Machined Features | ±0.10 mm |
| Critical Features | ±0.05 mm or tighter |
| Holes & Press Fits | ISO H7, ±0.025 mm typical |
| Flatness (on surfaces over 50 mm) | ±0.05 mm (only when specified) |
| Perpendicularity / Parallelism | ±0.1 mm or within GD&T spec |
The Hidden Cost of Over-Tolerancing
Every decimal point tighter than what your part needs adds more machine time, potential scrap, and post-inspection labor. Especially for prototype parts, this adds cost without adding value.
I’ve helped customers revise their tolerance stack-ups and save 20–40% on prototype runs by identifying where ±0.05 mm was excessive for non-critical regions.
When Tighter Tolerances Are Justified
- Press fits and interference fits (pins, bearings)
- Matings with other precision-machined components
- Moving parts requiring low-friction fits
- Sealing surfaces in fluidic systems
My Practical Advice
Start with the default CNC shop tolerances unless you know why tighter is required. Communicate your functionally critical features and ask your manufacturer for input. At Onlyindustries, we always review tolerancing during DFM to ensure cost-effective, functional results—especially for prototypes.
Remember: Good tolerance is not “tightest possible”—it’s “tight enough for success.”ity.
Finishing Options for Prototypes?
Skipping finish may save time—but it can cost you realism and performance.
When I prototype parts, finish often gets overlooked in favor of speed. But surface finishing isn’t just cosmetic—it affects function, fit, corrosion resistance, and user impression. The right finish can elevate a prototype from “rough concept” to “presentation-ready.”
Dive Deeper
Why Finishing Matters
Prototype finishes serve multiple purposes. On one hand, they simulate production aesthetics, which is crucial for stakeholder approval. On the other, finishes like anodizing or powder coating improve corrosion resistance and wear—especially if the prototype will undergo real-world testing.
Additionally, finishes can reduce friction, improve part handling, or remove sharp edges left behind by machining. It’s not just a final step—it’s part of the design intent.
Comparison Table of Common Finishing Options

| Finish | Material Compatibility | Main Benefit | Typical Use |
|---|---|---|---|
| Bead Blasting | Metals, plastics | Matte finish, hides tool marks | Cosmetic housing, grip texture |
| Anodizing | Aluminum | Corrosion resistance, color | Electronics, consumer devices |
| Powder Coating | Metals | Thick, durable color layer | Mechanical assemblies, brackets |
| Polishing | Plastics, metals | Glossy surface, removes scratches | Optical prototypes, showpieces |
| Engraving | All materials | Labeling, logos, traceability | Industrial parts, custom branding |
Finishing Tips for Better Prototypes
- Don’t overdo it: Apply finishes to visible or functional areas first.
- Use masking: Protect threads or contact surfaces from coatings.
- Request samples: If color or texture matters, test first.
- Consider post-machining distortion: Some finishes may alter tight tolerances.
Real-World Example
One client needed a prototype for a handheld medical device. We bead-blasted the outer shell for grip, anodized it for brand color, and engraved the company logo—all on the prototype. The result? Stakeholder approval within one review cycle, and no changes needed before production.
Bottom Line: The right finish helps prototypes look, feel, and perform like final parts—making user testing, demos, and investor meetings dramatically more effective.
At Onlyindustries, we offer in-house finishing for prototypes to match your intent—whether you need function-first protection or presentation-grade polish.
Conclusion
CNC prototype machining delivers speed, precision, and scalability from day one.
In my experience, successful product development always comes down to how quickly you can test, learn, and improve. CNC prototyping enables exactly that. With its ability to produce high-tolerance parts in real materials—often within days—this method empowers designers and engineers to move with confidence through every iteration.
Whether you’re optimizing for fit and function or preparing for presentation and investment, CNC prototype machining offers unmatched reliability and flexibility. From medical startups needing surgical-grade accuracy to consumer brands aiming for that perfect tactile feel, the process meets you wherever you are in development.
And when paired with smart design choices and appropriate finishes, CNC prototyping becomes the shortest path from concept to production-readiness.
At Onlyindustries, we provide full-cycle CNC machining with expert support for material selection, DFM optimization, and finishing guidance. We’re here to make sure every prototype doesn’t just meet spec—but exceeds expectations.
Ready to bring your next idea to life?
Reach out today for fast quoting, engineering insights, and prototype delivery you can count on.